As a freelancer, getting paid on time is just as important as delivering quality work. Yet, many freelancers struggle with creating clear, professional invoices, which can lead to delayed payments or confusion with clients. An invoice is more than just a bill. It’s a formal record of the services you’ve provided and a tool to manage your finances efficiently. So, it is important that you understand how to create an invoice as a freelancer.
In this guide, we’ll break down the essential elements of a freelancer invoice, show you how to create one step by step, and share tips to ensure you get paid accurately and on time.
Understanding What an Invoice Is
An invoice is a formal document that a freelancer sends to a client to request payment for services rendered or products delivered. Unlike a receipt, which confirms payment, an invoice serves as a request and a record of what is owed.
It helps both you and your client keep track of transactions, ensures clarity about the services provided, and can even serve as a legal record if disputes arise.
Key Elements of a Freelancer Invoice
A professional freelancer’s invoice contains several important elements, each serving a specific purpose in documenting the transaction and ensuring clarity.
1. Freelancer Information
This section identifies the freelancer issuing the invoice. It typically includes the freelancer’s full name or business name, address, email, and phone number. It serves as the official point of contact for the client.
2. Client Information
This section contains the client’s name or company name, address, and contact details. It designates who the invoice is directed to and ensures the document is tied to the correct recipient.
3. Invoice Number
It is a unique identifier assigned to each invoice. The invoice number distinguishes this document from others and provides a reference for both the freelancer and client in record-keeping and communication.
4. Invoice Date and Due Date
The invoice date indicates when the invoice is issued, while the due date specifies when payment is expected. These dates provide a formal timeline for the transaction.
5. Description of Services or Products
A detailed listing of the services rendered or products delivered. This element clarifies what the client is being billed for, often including quantities, project milestones, or hours worked.
6. Rates and Totals
This section shows the cost of each service or product, along with any applicable taxes, discounts, and the overall total. It provides a clear breakdown of the financial obligation.
7. Payment Terms and Methods
It specifies the acceptable modes of payment (e.g., bank transfer, PayPal) and conditions for payment, such as timelines or late fees. This element formalizes the expectations for settling the invoice.
8. Optional Notes or Messages
A section for additional information, such as special instructions, thank-you notes, or reminders. While not mandatory, it can enhance professionalism and maintain a positive client relationship.
How to Create an Invoice as a Freelancer?
Creating a freelancer invoice can be simple and efficient if you follow a structured approach. Here’s a step-by-step guide to help you craft a professional invoice:
Step 1: Gather Client and Project Information
Collect all necessary details about the client, such as their name, company, and contact information. Also, gather specifics about the project or services rendered, including hours worked, deliverables, and dates. This ensures the invoice accurately reflects the work done.
Step 2: Assign a Unique Invoice Number
Give your invoice a unique identifier to track it easily. This could be a sequential number or a combination of numbers and letters, helping both you and the client reference the invoice in future communications.
Step 3: Include Freelancer and Client Details
Add your own information (name, business name, address, and contact details) and the client’s information. This clearly indicates who is issuing the invoice and who is responsible for payment.
Step 4: Add Invoice Date and Due Date
Specify the date the invoice is issued and the payment due date. This sets a clear timeline for the client and helps you manage your cash flow effectively.
Step 5: List Services or Products with Rates
Detail the services you provided or products delivered. Include descriptions, quantities, hours worked, and individual rates. This makes the invoice transparent and reduces the chances of payment disputes.
Step 6: Calculate Totals and Taxes
Add up the costs of all items or services to provide a subtotal, include any applicable taxes or discounts, and calculate the final total amount due. This ensures clarity and accuracy in billing.
Step 7: Specify Payment Terms and Methods
Clearly state how you expect to be paid (e.g., bank transfer, PayPal) and any conditions, such as late fees or early payment discounts. This formalizes the payment agreement.
Step 8: Review and Finalize the Invoice
Double-check all information for accuracy, including client details, amounts, and dates. Convert the invoice to a professional format, like PDF, to prevent edits and maintain professionalism.
Step 9: Send the Invoice to the Client
Email or deliver the invoice using the agreed-upon method. Include a polite message summarizing the work and expressing appreciation, which reinforces professionalism and encourages timely payment.
Creating an Invoice Automatically:
If you’re struggling with creating an invoice manually, you can use CreateInvoice for automatic invoice generation. This tool is designed to make this process simpler, and you can use it completely free. Here’s how you can use it:
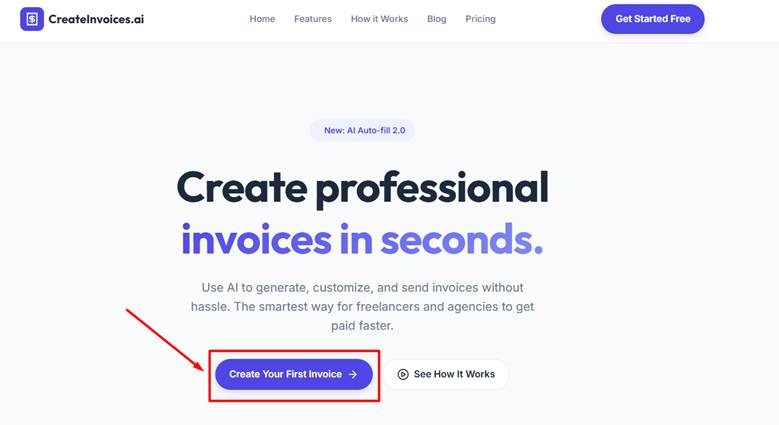
- Open our official website and click on “Create Your First Invoice.
- Select a relevant template.
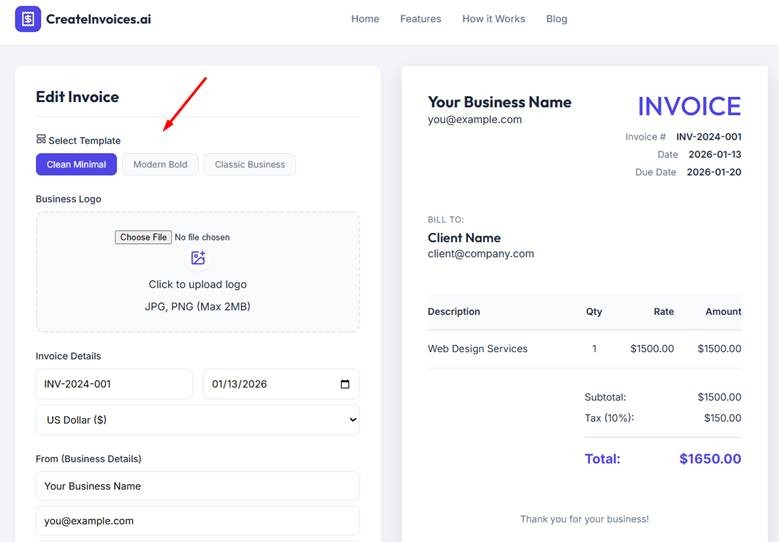
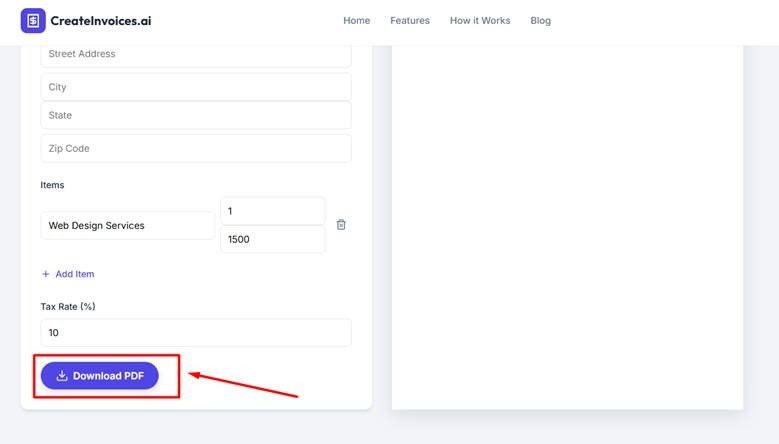
- Add all the required information, such as business logo, date, payment data, etc.
- Once done, click on “Download PDF.”
- Now you can use this invoice to send to your client, keep for your records, or attach to your payment request.
Pro Tips for Creating an Invoice as a Freelancer:
Creating an invoice is straightforward, but small adjustments can make your invoices more professional and improve your chances of getting paid on time. Here are some expert tips:
- Use a consistent invoice template for all clients.
- Assign invoice numbers sequentially for easy tracking.
- Provide clear and detailed descriptions of services or products.
- Include payment terms, due dates, and accepted payment methods.
- Double-check all information before sending the invoice.
- Send invoices promptly after completing work or milestones.
- Keep organized digital or physical records of all invoices.
- Add a short thank-you note to maintain professionalism and build client relationships.
Final Thoughts:
Creating a professional invoice is essential for every freelancer to ensure timely payments and maintain clear records. By including all the key elements and following a structured process, invoicing becomes quick and efficient.
Small touches, like clear descriptions and polite notes, can enhance professionalism and client relationships. Consistently applying these practices will help you manage your finances confidently and grow your freelance business successfully.
Frequently Asked Questions (FAQs):
It’s best to send your invoice as soon as the work is finished or at agreed-upon milestones. Prompt invoicing helps maintain cash flow and reduces the chances of delayed payments.
Yes, you can issue invoices for partial work or milestones if agreed with the client. This allows you to get paid gradually while the project is ongoing.
If your country or state requires you to charge taxes, you should include them on the invoice. Otherwise, you can leave the tax section blank or note “not applicable.”
PDF is the most professional and widely accepted format. It prevents editing and ensures the client receives a clean, readable document.
Send a polite reminder email referencing the invoice number and due date. Give the client a few days to respond before considering additional follow-ups or late fees.